
So you have a brand new WordPress website (congratulations!), and you have people on your team who are super excited about adding content. You already know the importance of writing interesting posts and uploading eye-catching images to make your site stand out…but the editing tools don’t quite look – or work – the same. It’s different, kind of confusing, and causing some frustration to the normally gung-ho content team. We’ve had several clients ask for assistance. So, while a little more technical than most of our blogs, this post will provide a little tutorial on how to edit your site quickly and efficiently using the WordPress Visual Editor.
At insight180 we have been creating lots of great new WordPress websites for our clients. In some of our newest sites, like Glen Mar Church, CityLit Project, and Hilltop ELC, we used a theme and a page builder to help them come to life and to make them easier (we think) to update. One of the key components of those page builders is the WordPress Visual Text Editor, where you place all of that great new branded content to help attract and engage your audiences and show who you are as a company. The Visual Text Editor is different than the new Gutenburg Blocks Editor, but we think it is much easier to navigate, therefore, I wanted to highlight it in this blog post. While we always like to provide basic WordPress training with all of our sites, I thought it might be helpful to provide a quick reference to easily find the basics of what all those buttons mean in that WordPress Visual Editor.
Getting Started
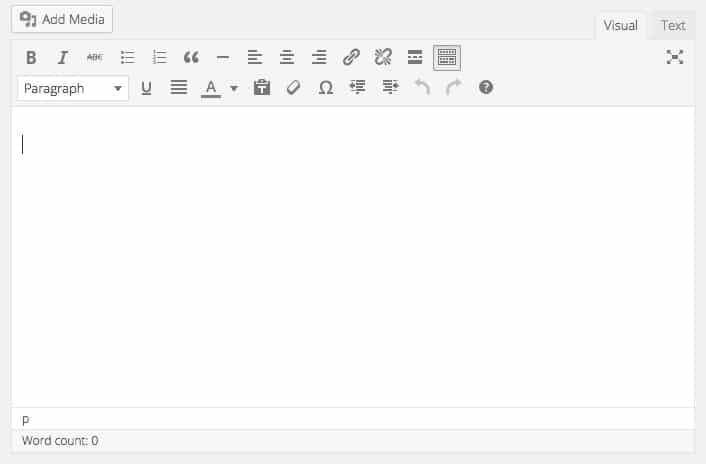
Let’s take a look at the WordPress Editor. It is simply a large box with a horizontal toolbar and a white text area where you will enter, or cut and paste, all of your content. Looks easy enough, right? But what are all those buttons and how can they help me? Let’s take a look.
Visual and Text Mode
On the right upper corner you will notice two tabs: Visual and Text. Here you can choose between the two editing modes and either work in the Visual mode (WYSIWYG) or in the Text (HTML) mode. If you toggle between them you will also notice that both modes show different toolbars. For most of our clients, who are new to WordPress we recommend using visual mode so you don’t get intimidated by code; but if you are familiar with HTML, using the text mode will give you more precise control over your content and solidify how things appear on the page. For the purpose of this blog, I am just going to stick with visual mode.

The visual mode allows you to format your text very easily using the toolbar icons and without requiring HTML knowledge. There are two (2) rows of editing icons contained within the visual editor. When initially opened, the visual editor will display a single row of icons. You can expand the toolbar by using the toggle icon (shown below).

If you don’t have this reference guide available, you can find out what any icon means or does by hovering over it with your mouse – a small tooltip will appear when you do that – but I am going to explain and show them all here:
Text Styling
This style drop-down menu allows you to adjust the style of any selected text with various pre-defined styles that are built into your theme. This is where you can choose the different heading styles that your website designer created specifically for your site or you can stick with the default which is Paragraph and will assign the body text style to your text.

Text Decoration
The next set of buttons is used to stylize your text a bit further. The “B” is the bold icon at the top left. Clicking on this will make your selected text bold. The “I” is for italics. Clicking on this will italicize selected text. The “ABC” with the line through it is a strikethrough. This is typically used to show errors or changes made to your post, like this. Finally the “U” with the underline is used to underline words or parts of your text.

Text Color
This button – the A with the drop-down menu – allows you to change the color of your text. To change text color you must first highlight a section of text. Clicking on the down arrow next to the text color button will display a color selector. Selecting a color will then apply that color to the selected text and make it the default color for the color button. Clicking on the text color button itself after that will apply the last default color you selected for use within your content.

Lists
There are two different types of lists. The first one is called a “bulleted list” and creates an unordered or bulleted list from your text. The second type is “123 list” which creates a numbered and ordered list.

Blockquote
The blockquote button, is a way of displaying quoted text. Each theme will style this differently. If you highlight your text and click the block quote icon the stylization will automatically be applied for you.

Horizontal Rule
The “dash” button inserts a horizontal line wherever your cursor is when you click.

Alignment
The “dash” button inserts a horizontal line wherever There are four buttons that represent alignment. The tope three are used to align your text left, center or right. The bottom button is to justify your text, meaning space will be automatically placed so that the left and right margins are even.

Links
The link button allows you to select text that will link to another page within your website, an external website, or an email address. Next to it is the unlink button, to break or deselect that link.

Read More
The “insert more” button allows you to create a break in the page to give a shorter preview in your post listings. This tool may or may not affect your site depending on the way your theme functions. Some themes use this element to show an excerpt of the post on your site’s main blog page and some don’t. In many cases it is automatically determined by the number of characters set with your site’s theme.

Formatting Tools
The next two buttons are helpful if you copy and paste text from somewhere else to place within your Visual editor. When you do this, you will more than likely discover that often, additional characters appear or you may have trouble adding/changing the formatting. That’s because some of that prior formatting is still enabled. We notice this particularly when copy was drafted in Microsoft Word and then cut and paste to your WordPress post. To eliminate the weird characters and altered spacing use the “paste as text” button (the “T” on the clipboard image). It uses a special cleanup process that will remove any special formatting and HTML tags that may otherwise change the way your text looks. Once you click the “paste as text” button, a window appears where you can enter your text.
The second button or eraser is the “remove formatting” button. As you would expect, it removes all formatting (bold, italic, colors, etc.) from a highlighted section of text so that you can start fresh. First select your text, and then click the button. This is especially helpful if you forgot to use the “paste as text” button, but be warned that if you have links already applied within your text, it will also remove those links. Once you’ve removed formatting, you will have to add back in styles for bulleted and numbered lists, bold, italics and headers.

Special Characters
The “Omega” button can be used to insert a custom character, like the copyright or trademark symbol, by selecting it from the list that appears in the pop-up when you click the button. You can click any character from that list, and it will be inserted at your cursor position

Outdent & Indent
These two buttons are pretty straightforward; the indent button will move text in to the right by one level, and the outdent button will take away one level. These buttons are best used to make text stand out when you don’t want to use a list approach.

Undo & Redo
The “left” and “right” arrow buttons help with undoing and redoing any actions or formatting you have just completed.The left arrow is to undo an action and the right arrow will redo an action.

Help
The “left” and “right” arrow buttons help with undoing and redoing any actions or formatting you have just The last button is the “question mark”. This button leads you to the visual editor help menu. It will help to answer any questions you may have about the visual editor.

At first, this may seem like a lot of information to take in, but hopefully the visual reference helps explain it. Don’t be discouraged. It just takes a little practice. The Visual Editor allows you to bring style to your website without having to know HTML and it displays your changes as you go. The options may seem somewhat limiting, but once you get this down, you can start learning some HTML so that you can begin to use the visual and text editors interchangeably to have even more control over style.
